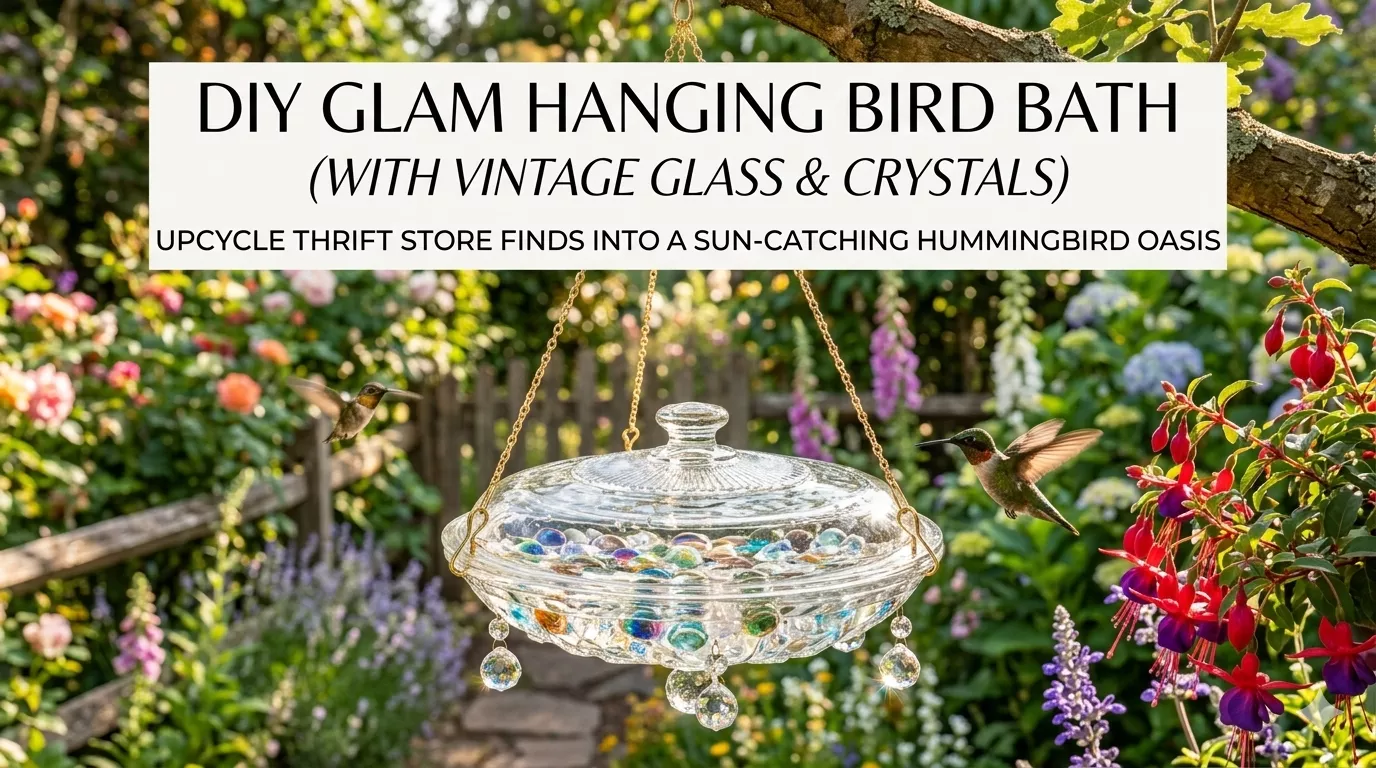
DIY Glam Hanging Bird Bath (With Vintage Glass & Crystals)
Turn Thrift Store Finds into a Sun-Catching Hummingbird Oasis
Want to elevate your outdoor space while turning your backyard into the ultimate neighborhood hotspot for hummingbirds? This DIY Glam Hanging Bird Bath perfectly bridges the gap between clean, minimalist structure and high-vibe garden sparkle.
By upcycling everyday vintage glassware and combining it with light-catching crystals, you create a gorgeous, functional piece of living decor. The shallow depth and brilliant reflections are specifically optimized to attract tiny pollinators, giving them a safe, glamorous place to splash and drink.
Project Overview & Materials
| Difficulty | Time Required | Budget | Key Attraction |
| Easy / Beginner | 30–45 Minutes | Low (Thrift-Friendly) | Hummingbirds, Goldfinches & Songbirds |
The Master Supply List
1. The Basin (Your Thrifted Treasure)
- Vintage Glass Pot Lid: Look for heavy clear glass lids (like old Pyrex or CorningWare) with a distinct rim. Inverted, these make the ultimate shallow bird pools.
- Shallow Vintage Glass Bowl: Scour thrift stores for clear cut-glass, amber glass, or depression glass bowls.
- Note on Depth: The ideal basin should hold no more than 1.5 inches of water. Deep water intimidates small birds like hummingbirds.
2. The Support System (Choose Your Aesthetic)
- Option A (Minimalist Chain): A 3-way heavy-duty metal hanging chain with clips.
- Option B (Afro-Chic / Boho Macrame): 4mm cotton or hemp cord to knot a clean, geometric structural cradle.
- Option C (Modern Iron Tripod): A low-profile, minimalist metal plant stand if you prefer a ground-based tier rather than a hanging feature.
3. The “Glam” Elements (Sun-Catchers & Safety Footing)
- Waterproof Chandelier Crystals: Teardrop glass prisms or faceted glass beads.
- Flat-Bottomed Glass Marbles: Clear, iridescent, or light amber glass gems.
- Adhesive: Clear, 100% waterproof silicone glue (aquarium-safe is best) if you want to permanently fuse your accent crystals to the rim.
Detailed Step-by-Step Guide
Step 1: Source & Prep Your Glassware
Head to a local secondhand shop or dig through your kitchen cupboards. You want a glass piece that is entirely clear to allow light to pass through completely.
- Thoroughly scrub the glassware to remove all old grease, price tag residue, and dust.
- If using an inverted pot lid, make sure the center knob is stable. (If it unscrews, remove it and seal the tiny screw hole with a dab of waterproof silicone glue).
Step 2: Engineer Your Hanging Mount
Your choice of support completely defines the final style of the piece:
- The Chain Method: Clip a 3-way bird-bath chain evenly spaced around the outer rim of your glass lid. The tension of the clips against the heavy glass lip will keep it balanced.
- The Structural Macrame Cradle: Measure and cut four equal lengths of cord. Tie them together with a heavy base knot directly under the center of the bowl, then use basic alternating square knots up the sides to form a tight, minimalist net that cradles the glass perfectly flat.
- The Tripod Setup: If you don’t have a sturdy tree branch or shepherd’s hook, nestle a sleek iron tripod plant stand firmly into your garden bed and set the glass basin securely into the ring.
Step 3: Secure the Rim Crystals (Optional Glam Step)
To get those high-end, dreamy light reflections along the perimeter:
- Squeeze a small bead of clear silicone glue onto the flat top edge or rim of your glass basin.
- Press your faceted chandelier crystals or glass teardrops firmly into the silicone, spacing them out evenly.
- Let the adhesive cure completely for 24 hours before adding water.
Step 4: Layer the Pebble Footing
Scatter your flat-bottomed glass marbles and loose crystal beads across the bottom of the basin.
- The Logic: Smooth glass can be incredibly slippery for tiny bird claws. Layering these textured glass gems gives hummingbirds a secure, shallow footing so they feel steady and safe while drinking or bathing.
- The Magic: The multiple facets of the marbles split the sunlight, creating dancing light patterns on nearby foliage that act as a visual beacon for birds flying overhead.
Step 5: Fill and Hang for Maximum Visibility
- Take your completed assembly out to the garden. Hang it from a strong shepherd’s hook or a sturdy tree branch.
- Pour the water slowly. Fill it just enough to partially submerge your glass marbles (about 0.5 to 1 inch of water maximum).
- Ensure the structure hangs completely level so the water doesn’t spill over one side.
Pro-Tips for a High-Traffic Bird Sanctuary
The Ultimate Hummingbird Magnet
Hummingbirds are naturally drawn to moving water and bright, flashing reflections. To guarantee visitors, place your glam bird bath directly near nectar-rich, tubular flowers like Fuchsia, Salvia, Bee Balm, or Honeysuckle. The combination of food and a sparkling bath is irresistible.
- Combatting Algae: Because crystal-clear glass lets in maximum sunlight, algae can form quicker than it would in traditional concrete baths. Keep a small spray bottle of water and white vinegar nearby. Give the basin a quick rinse and wipe-down every 2–3 days to keep the glass sparkling and safe for the wildlife.
- Safety Zone: Always hang your bird bath at least 4 feet off the ground and at least 5 feet away from dense, low-lying bushes. This gives birds a clear line of sight to spot any backyard predators (like neighborhood cats) trying to sneak up on them while they bathe.
- Add a Solar Bubbler: Want to take it to the next level? Place a miniature, lightweight solar-powered water bubbler right in the center over the marbles. The rippling water combined with the crystals will create a mesmerizing garden feature that sounds as beautiful as it looks.
#GlassBirdBath #HummingbirdGarden #OutdoorLiving #GardenInspiration #DIYGarden #UpcycledDecor #MinimalistGarden